 Oh, the joy of the holidays, a special time of year where we take tons of photos and actually have some downtime afterward to get organized. With that in mind I thought it might help someone to offer my system for handling my digital photos. We have over 15,000 digital photos, which is great, but only as great as our ability to go back and access them easily.
There are dozens and dozens of tools out there designed to help people organize and display photos, so there are many organization schemes, some excellent. When I was inventing my wheel, I defined two high priorities: quick access and cheap price. I’ve been extremely happy with this system after over a year, and hopefully others can integrate it and enjoy it as much as I have.
ACCESS
Being able to find that specific photo is made easy by a great system. Was that photo I love of my daughter on the boat at the beach in 2008 or 2007? Was it the May trip or was it the June trip? We had a yard sale a couple of years ago. Did we have that in October or September, and do the photos of the unsold items include the old popcorn popper? Where is that early construction photo of the RBC Center? Where are those favorite 15 photos from Disneyworld? These types of questions can be answered quickly with a good system in place.
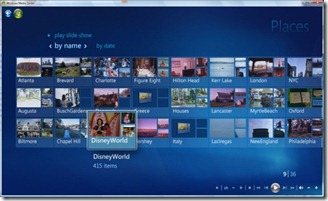
What about those times when there are guests in the house? The last thing you want to do is lug them into your liar and have them huddle around the computer screen while you search and search for a photo. That’s why we really enjoy accessing photos through Windows Media Center (pictured above). With our setup we have the den TV directly connected to the central Media Center PC, and all of the other TVs have Media Center Extenders. This allows us to access our entire photo collection from any TV in the house, which is a huge convenience, especially when guests are in the house. This isn’t a requirement, but makes the system far more powerful.
ORGANIZATION
Whether one is browsing through pictures of a lost pet or searching for a photo of a specific place, a collection of photos that is efficiently tagged will save loads of time and add a tremendous amount of value to a photo collection. The key is file tagging.
What is “tagging�
In the old days we took a developed photograph and placed it into an album, usually arranged chronologically and/or by subject. With digital photos one can tag a photo with as many organizational tags as they wish, and the single photo will appear in any number or applicable search results. For instance, if I have a photo of my nephew, my daughter, and my cat taken on the dock at the family beach house during my sister’s birthday party, I can tag the photo as “Drewâ€, “Lindsay Anneâ€, “Maddieâ€, “BeachHouseâ€, and “Kim’s 35thâ€. When I use software that can quickly display all of the photos tagged “Maddieâ€, the party photo appears in the collection. When I look at the “Drew†photos, the photo will shows up as well. So not only is tagging great for finding a particular photo that has known qualities, but also it is excellent for putting together “virtual†photo albums.
There are many tools for photo tagging, but I’ve found that Windows Live Photo Gallery is the best. Not only is it a free download, but it also writes the tag information in the .JPG file itself. Most other photo programs, like Picasa, store this tag information in a separate database file, making the database only usable in that one particular piece of software. If the tags are stored in the photos themselves, however, one can transport a collection of photos to another computer without losing all of the tagging information.
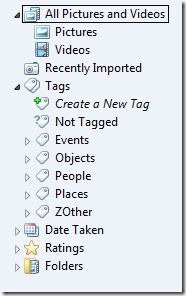
 Once one installs Live Photo Gallery and points the software to a folder structure containing photographs, the next step is to create a set of frequently used tags. The second big asset for Live Photo Gallery, is that it allows tag hierarchies to be formed. I created five top-level tags under which all photos fall: Events, Objects, People, Places, and Other. (literally entered as “ZOther†in order for force it to the bottom of the alphabetical list.) Under People, I have a hierarchy of tags: People:Family, People:Famous, People:Friends. Under People:Family, I have these tags: People:Family:Immediate, People:Family:McCall, People:Family… Under People:Family:Immediate, I have a tag for each of the 4 family members (including the cat).
 A major problem with Picasa (and several other software programs), is that it does not allow hierarchical tags. Therefore once tagging is complete, one will find a list of tags that are not organized. Unrelated tags like “Beachâ€, “Ballparkâ€, “Benâ€, and “Beerfest†will all appear together in a giant list of tags. While a hierarchical tag structure requires a viewer to drill downward through three or four layers, typically, it is still extremely manageable and efficient.
Going through thousands of photos, tagging each for the relevant people, places, and events shown is not a quick process, so I recommend only doing a couple hundred at a time, depending on the size of your collection. The good thing is that this is not a particularly intellectually challenging project that requires 100% focus, so it can be done during football games with great ease. Remember, too, that these because the tags are written to the JPGs themselves, this project can be done across a network, so it can be just as efficient to sit at a laptop in the den as it is sitting at a desk at the house’s main computer.
File Location
So, the virtues of tagging should be clearer by now, and that leaves one question: how to I physically organize the JPG’s themselves on the hard drive? I once tried organizing the photos by the event or main subject of the photo, and it was a disaster. Tagging serves this purpose much better. So if we are dealing with, essentially, a database and search system all the time, I ought to be able to just dump all of my photos into one giant folder, right? Not so.
There are two problems with a blind dump. One is that cameras create filenames usually based on a sequence by that particular camera. What if a family has more than one Canon camera, all using the same numbering scheme? What if a camera’s numbering sequence accidentally gets reset? In both cases there will be filename duplicates, creating an unacceptable situation in any operating system.
Another problem with a blind dump is every operating system’s inabilities to efficiently display a folder containing thousands of files. If you like watching hourglasses and throbbers, be my guest and create large folders.
The most efficient system I have found is to rename each file as it is being put into the file structure. First, move the files off of the camera’s data card into a designated temporary folder with Windows Explorer. The folder I created for this is:
C:\Users\Public\Pictures\UNPROCESSED_PHOTOS
To save time, I placed a shortcut to this photo in my “Send To†context menu (see post about editing the SendTo list). By selecting all photos on the card, and Shift-selecting Unprocessed_Photos using the Send To shortcut, I can move photos to a designated spot in one quick action.
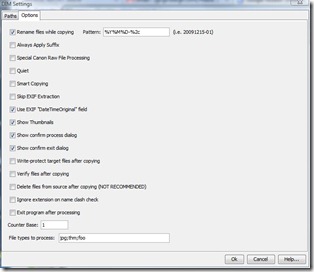
The next step is where the magic lies. I use a small, free piece of software called DIM.jar to move the photos to their final destination. (DIM requires that Java is installed). I use DIM to read the date of the photo, rename it based on a YYYYMMDD-XXX.jpg format, and copy it to a folder hierarchy in Public Pictures that corresponds the year and month of the photo.
 Go into the DIM settings and change the output filename code to “YYYYMMDD-%2c.jpgâ€. The result will create a file with the year, month, and date in the filename. Because one may do a quick series of photos that takes 2 photos in the same second, I don’t feel the timecodes of HHMMSS are worth the bulk they add to the filename. Instead, I prefer an arbitrary 3-digit number that is assigned for the photo in the batch. A photo called 20081225-134.jpg is the one from Christmas in ’08 with an arbitrary 134 attached. (That three-digit number gets reset each time DIM is launched)
Once you have verified that the photos copied correctly, then go to UNPROCESSED_PHOTOS and delete its contents. I do not recommend having DIM “move†the files, as sometimes there are glitches (ie. date setting was wrong on camera, some setting in DIM setup wasn’t quite right).
One important thing to remember is to NOT touch your files before sending them through DIM. This especially includes rotating the file in Windows Photo Viewer! Any time a change like rotation, cropping, contrast, etc is made, the JPG file is rewritten such that the metadata reflects the editing time as the time the photo was taken. This create inaccurate filenames and can result in photos being in the wrong folder on the hard drive.
This sounds like a big endeavor, but it really isn’t. I’ve trained myself to follow this sequence every Sunday:
- Insert photo card into computer’s card reader
- Open Windows Explorer, and move the photos to the Unprocessed folder (Shift-select Unprocessed folder in the SendTo menu)
- Open DIM from Start Menu shortcut
- Quickly double-check DIM’s settings
- Hit “Processâ€
- Verify that photos are in the correct month folders
- Erase contents of Unprecessed
Occasionally (and I mean once or twice a quarter), I’ll sit down with my laptop in the den while somewhat paying attention to a sporting event, and tag photos across the network.
The result is a system that is very easy to navigate from all over the house. If I want that photo of us from the tailgate party before the 2002 hockey playoff game, I can go to the “RBCCenter†tag and quickly peruse the couple of dozen photos from there. If I want to copy this photo to a website like Flickr, I’ll simply note the filename and easily find it using Windows Explorer. This is a snappy process given that any one month folder only has, maybe, a couple hundred files.
Having an organized, accessible photo collection is a giant luxury. I certainly realize this when I look through old family photo albums that only have a few dozen photos. They are hard to find, in small collections, not backed up, and organized using only one method. Ironically the amount of effort with the system described takes less time and effort than it did in the old days.
Tags: Lifehacking, Photography, Tech // 3 Comments »
![185149[1] 185149[1]](http://www.blog.danamccall.com/wp-content/uploads/2010/01/1851491-thumb.jpg) Fujitsu has finally released an updated driver for their phenomenal ScanSnap S510 sheet fed scanner. The update comes 76 days after the release of Windows 7, and 246 days after Windows 7 release candidate was officially released.
Fujitsu has finally released an updated driver for their phenomenal ScanSnap S510 sheet fed scanner. The update comes 76 days after the release of Windows 7, and 246 days after Windows 7 release candidate was officially released.


