Show Us Your Dentrix Patient Chart Layout

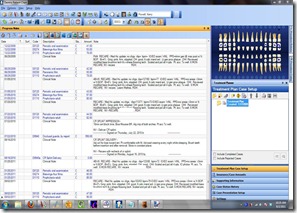
ClassicChartFans of the newer versions of Dentrix’s Patient Chart know that the ability to move modules around is a great feature. We have set up slightly different views in hygiene rooms from the views in operative and administrative, and the flexibility Dentrix offers is much appreciated.

With a patient chart view, I want to maximize the space I have. Each operatory has a 24” widescreen monitor at the 12 o’clock position, and without having to click on a tiny icon, I want to be able to quickly see the patient’s existing treatment, treatment plan, and the Clinical Note from the last visit. (I want other modules to appear, too, but that is the subject of another article.) I really want to see more history than that, though, and the default setting for the Clinical Note wastes a lot of space inserting blank lines between each Progress Note item.

I have solved this on most of my computers. I removed unwanted columns from the Progress Notes screen (right-click on any of the column heads like Date, Tooth, Code, etc and select from the menu). Notice that Dentrix puts Notes on a second line in the column headers by default. Simply drag this item up to the first line to the right of Amount, and you’ll see tons of white space disappear. The result is that I can easily Clinical Notes for the most recent 5-7 appointments.

What look have you settled on? Post a link to a screen shot so we can see! (the best way to grab a screen is to use Vista/7’s Snipping Tool. Hit the Windows key on your keyboard, and type in Snipping Tool, and select it from the start menu results. Get a Window snip, then edit it in something like paint to remove personal information. It should take about 5 minutes to complete this portion, but it will be a help for years to come for the rest of us.)

Flagging A Patient Population in Dentrix

flagHave you needed to set Dentrix alerts to a specific portion of the patient population? Dentrix only allows per-person alerts to be set, so there is no way to natively set a large number of alerts to a target set of patients. However with the instructions below, one can set a group of alerts with limited difficulty!

In our office we want to use the email information for each patient more and more. The problem is that at least half of the patients have not supplied this information. We tried to simply look for this information as each patient was in our office, but it is too difficult to remember to check. Therefore we want to set up a patient alert for each of the patients with no email. To do this I set up a Dentrix alert in each chart with a blank email field. Now whenever a staff member opens an appointment card or chart for one of these people, they will know to ask the patient for their email address.

Dentrix requires that these alerts be set on a patient-by-patient basis. So we will have to perform a query, then use AutoHotkey to open each patient’s Family File and set the alert. For our run, it took the machine about 10 seconds per patient to set the alerts, so the entire process only took a couple of hours. This isn’t the most straightforward activity, but it eventually saves the time it would take to either manually enter each patient’s alert or to hunt for this information when they are in the office (if you even remember to look for it).

[Read more →]

Using AutoHotkey to Send Gmail Messages from Dentrix

Electronic messaging has become the preferred method of reminders by many practices and patients alike. Recently I posted about how to make Dentrix send text messages, however some prefer to send an email instead.

There are many companies offering text and email messaging services to dental office, but most are expensive and achieve the same results we can get for free using AutoHotkey and Gmail with Dentrix. If you aren’t a Gmail user, then you can use a text editor, like Notepad, to easily substitute your own keystrokes into the appropriate section of the script.

AutoHotkey is a scripting application for Windows that allows one to reproduce a stream of keystrokes easily. In order for it to work with Dentrix in Windows 7, specifically, it must be run in XP mode:

  • Install AutoHotkey (use the Instaler for AutoHotkey_L option)
  • Open Windows Explorer (Win-E)
  • Navigate to C:\Program Files\AutoHotkey\
  • Right-click on AutoHotkey.exe, and select Properties
  • Click on the Compatibility tab
  • Select the checkbox for “Run the program in compatibility mode for:”
  • Select Windows XP (Service Pack 3) in the dropdown box
  • Select “OK”, and close Windows Explorer.

Here is how we handle emailing with Dentrix in our office:

[Read more →]

Using AutoHotkey to Ease Dentrix Document Center Woes

One of the difficult things to do in Dentrix’s Document Center is to add a multiple page document. In our office we scan all documents destined to Dentrix Document Center quickly with a ScanSnap S510 scanner. This remarkable printer does front and back scanning at a rate of 3 seconds per page. It is not, however, a TWAIN compliant scanner, so we scan all documents to the Desktop, and acquire them as files from Dentrix Document Center.

Expand the Tree

Dentrix Document Center opens with all of the file tree collapsed. I like to add an additional Expand List icon to the left end of the Acquire toolbar, just above the patient’s photo in the tree. However if you are into using keyboard shortcuts, you may be disappointed with the “+” key’s ability to only expand the tree one level down. A more powerful alternative is to add a script which enables the “+” key on the number pad to open the entire structure.

Import

The steps just for acquiring a one-page document are only easy after burning the pathways into your head. To make things simple I use AutoHotkey to quickly insert a document. The script is loaded at the beginning of the day and enables several keyboard shortcuts using the keyboard’s numberpad. By pressing Alt+1 (“Alt” and then “1” on the numberpad), commands are sent to open the Import screen of the last folder viewed (in our case it is the Desktop folder). Simply double-click on the first page of the document scanned, and the Document Information screen appears.

Add Pages

Adding subsequent pages to a multi-page document is where things get difficult in Document Center. Instead of hunting down icons, we simply press Alt+2 (on the numberpad) and the Import screen reappears, awaiting selection of the document’s next page. This can be executed repeatedly until reaching the document’s final page. After the document is complete, close the editing mode by hitting the Modify Document icon again (on some computers it will be highlighted on the toolbar when it is open).

In order for this hotkey to work correctly, one must assign a hotkey in Dentrix Document Center. Select an existing, unsigned document, and click on the Modify Document icon (alternatively you can hit Alt-E, O). Then right-click on the UltraToolbar1 that appears and select “Customize”…. (it is the toolbar with Copy to Clipboard, Add Page…). Select “Keyboard…”. In the Commands section, scroll down the alphabetical list to “Import From File…” and left-click on it once. At the bottom of the window select the drop-down button under “Specify a Shortcut” and select “Ins” from the list. Then hit Close. (If you have already assigned "Ins” to another key, you’ll need to assign Import from File to another hotkey and edit the script below accordingly).

Sign

One last order of business is signing the documents to lock them up and make them more legally sound. I do not have any signature pads, but I do have a Tablo stylus system (I got for a steal on Woot one day) mounted to a clipboard on my desk. The third script works for me, but you will most likely need to edit this script to make it work for your setup.

One problem with the signature screen in Dentrix Document Center is that it always pops up in the upper left, unlike its behavior in Dentrix Chart. My script opens the signature window and moves it down to the same spot Dentrix Chart puts it. This is key for a clip-on tablet system like I have. You may need to tweak the numbers in order to send the box to the desired coordinates. Nevertheless, if screen position is not important to you, simply remove the WinWait and WinMove lines from the script.

All I have to do after acquiring the document is to hit Alt+3 to pop open the signature window. This system of using AutoHotkey to assign Alt+1, Alt+2, and Alt+3 has made integrating Dentrix’s digital document handling incredibly more efficient.

AutoHotkey can be used for many more tasks in the dental operatory, but that’s the subject of another post.

The Script

In order to get the script to work, just paste the following into an AutoHotkey .ahk file. (For more information, see my previous article about using AutoHotkey to send text messages from Dentrix.)

; Script for acquiring from file in Document Center
#IfWinActive Dentrix Document Center
!Numpad1::
Send !a
Send f
return

; Script for acquiring additional page from file in Document Center
#IfWinActive Dentrix Document Center
!Numpad2::
Send !e
sleep 300
Send o
sleep 300
send {INSERT}
return

; Script for opening Document Center signature pad in a managable location
#IfWinActive Dentrix Document Center
!Numpad3::
Send !e
sleep 300
Send s
WinWait,Sign Document
WinMove,Sign Document,,500,380
return

Using AutoHotkey to Send Text Messages in Dentrix

The latest trend in dental office management is utilization of text messaging to remind patients of their upcoming appointments. Text messaging is wildly popular with young patients, but is also growing rapidly with older patients. A recent survey reported that adults between the ages of 55 and 64 send 38 text messages a month.

There are many companies offering text messaging services to dental office, but most are expensive and achieve the same results we can get for free using AutoHotkey and Google Voice with Dentrix.

Google Voice is a free phone service which offers free voicemail services, phone call forwarding, and free text messaging. When you set up your Voice account you have the option to choose a telephone among many available. We chose (919) BRU-SHEM!

AutoHotkey is a scripting application for Windows that allows one to reproduce a stream of keystrokes easily. In order for it to work with Dentrix in Windows 7, specifically, it must be run in XP mode:

  • Install AutoHotkey (use the Instaler for AutoHotkey_L option)
  • Open Windows Explorer (Win-E)
  • Navigate to C:\Program Files\AutoHotkey\
  • Right-click on AutoHotkey.exe, and select Properties
  • Click on the Compatibility tab
  • Select the checkbox for “Run the program in compatibility mode for:”
  • Select Windows XP (Service Pack 3) in the dropdown box
  • Select “OK”, and close Windows Explorer.

Here is how we handle texting with Dentrix in our office:

[Read more →]

Using an iPad with Dentrix

First of all, DON’T BUY AN iPAD RIGHT NOW (Jan ’11). Reliable sources say that Apple will be announcing the next generation iPad in 3-4 weeks, and presumably will release the product in March.

I am still using paper charts for storage of pans and forms…and I’m really sick of it. I think that the final barrier has been the awkwardness for patients signing forms. Until 2010 the cleanest option was to hand patients an expensive, heavy tablet PC. However that was not without its problems. As much as I hate Apple, I really think that the iPad will be the device that finally sends medicine and dentistry into true paperless charting.

The advantages to the iPad are relatively light weight, are an impressive tech statement to patients, have great battery life, and have fantastic resale value (a 1-year old iPad usually sells on eBay for $100 less than purchase price. We don’t see this great resale value with Android devices). With 35 competing tablets introduced this week at CES, there will be a strong push toward this form factor for intermediate computing, and that’s nothing but good for us in the dental field.

Currently it looks like there are three different options for using an iPad in the dental offfice:

eCentral’s Kiosk

Dentrix already has the forms functionality working with the iPad. It requires an eCentral Kiosk subscription that is $50/mo. Once you are subscribed you can upload items from the Dentrix Questionnaire module for patients to complete at home or in your office using any type of PC. Because this is all handled as a web app, the user’s computer shouldn’t matter, however they have not worked out kinks in Android. With a Droid X and a Galaxy Tab, the forms do not render correctly (the virtual keyboard has an assortment of upper and lowercase letters, and borders are incorrect). As voiced earlier in this forum, the interface does NOT have a true signature. Rather, you type in initials and the transaction apparently is as legal as any other transaction that occurs on the internet (however this makes me a bit nervous because who is to say that one of our staff members didn’t go in and create a fake document for the patient). For me, though, the $100/mo cost is pretty hefty and is offputting. (the $100 includes unlimited text messaging to your patients, but we already use Google Voice and Autohotkey to send them for free). Dentrix ran all over the country last year doing $25 seminars that primarily served as sales pitches for eCentral. The message I got is that they stand to make a LOT of money getting us addicted to their service.

Pros: clean interface, seamless data importing into Family File (no double entry), simple.
Cons: lacks true signature. costs.

Correction (1/10/11): I apologize that my notes were incorrect. Kiosk is not a part of the communications manager, but rather a part of Website Manager. The $50/mo also includes the ability for patients to log in and check appointments, make payments, and more.

PDF Completion

One could put completable PDFs on their website. Patients then complete the document in their Adobe Reader and print it, bring it to your office, your office enters the necessary data, then scans it to Document Center. For patients who are in the office (most common scenario), they would use an iPad for forms completion using an iPad app for PDFs that allows signatures (you would buy a cheap stylus that works with capacitive touch screens). The completed form is then synced automatically from the app to a Dropbox account which is synced to the receptionists computer. She then enters necessary data and easily imports the completed PDF into Document Center.

Pros: Cheap, offers true, legal signature, online forms access for patients.
Cons: double entry, requires scanning step for pre-completed forms, ?Dropbox HIPAA compliance?

Remote Desktop

One could set up a couple of old computers that are expressly used for being remoted into by an iPad app. The staff member runs the remote app, and brings up the patient’s necessary questionnaires, hands them the iPad, and afterward, assists them in creating a signature in Dentrix Questionnaire Signatures.

Pros: Cheap, seamless data importing into Family File (no double entry).
Cons: No internet forms access, staff must be trained to access these machines and set it up for patients, additional, headless machines must be maintained (must have a Professional version of Windows, not Home), Security (patient could potentially access network from the iPad’s remote desktop application).

[Read more →]

Solving AutoHotkey Problems in Windows 7

autohotkey There is plenty of love in the internet for AutoHotkey, the free macro application. It does allow a plethora of timesaving possibilities. I especially like it in situation where I am doing a repetitive series of keystrokes, but it also is great for text substitution (“btw” automatically becomes “by the way”) and for assigning macros to certain keys like Function keys, footpedals, etc.

I recently was attempting to send text messages from a dental software application called Dentrix. I was successful in getting data scraped from a spreadsheet and into a Google Voice message. However when trying to run repetitive tasks within Dentrix, AutoHotkey had absolutely no effect. I imagine there are other Windows applications that also render AutoHotkey impotent.

The problem is not with these applications. Rather it is with AutoHotkey, which is not specifically designed for Windows 7, even after that OS’ first birthday. The fix is simple, though. Just make AutoHotkey run in a Compatibility Mode. More specifically:

  1. Open Windows Explorer, and go to where your autohotkey.exe resides. (most likely in C:\Program Files\AutoHotkey)
  2. Right-click on autohotkey.exe, and click Properties
  3. Select the “Compatibility” tab
  4. Select the checkbox for “Run this program in compatibility mod for:”, and select “Windows Vista (Service Pack 2)” in the dropdown list.
  5. Select “Run this program as an administrator” checkbox, and select “OK”

This change will be reflected whenever any macros are launched. Good luck!

Dentrix, Dexis, and CAESY Enter the Windows 7 Era

Over the past year I have had some old machines in the office that were having extreme difficulty with lack of speed and driver instability in Windows XP. With all of the "problems" with Vista, I delayed purchasing new equipment and upgrading my version of Dentrix for a couple of years. With the arrival on Windows 7 and several "final straw" events, I decided to replace two of my machines and upgrade my server with Windows 7.

The road over the past three weeks has been rocky, but as crazy as it may sound, it has been more rewarding finding out the caveats of new hardware and software than it was banging my head against a wall with the old equipment and abandoned, malfunctioning drivers.

The following is a guide based on the state of hardware and software as of Thanksgiving in 2009 (Windows 7 has been officially released for 1 month). I use Dentrix, Dexis, and CAESY as my main workhorses in the office. Hopefully the information here will help to guide you in purchasing or waiting to purchase specific hardware.

I’ll first begin with software, and how it performs on a myriad of both equipment and versions of Windows 7 in my office. Each software package has been installed on a 32-bit and a 64-bit machine. On the 64-bit machines, both 32-bit and 64-bit versions of Windows 7 have been tested. Remember, you can install a 32-bit version of Windows 7 on a 64-bit machine, but you cannot install a 64-bit version of Windows on a 32-bit machine.

[Read more →]