Flagging A Patient Population in Dentrix
 Have you needed to set Dentrix alerts to a specific portion of the patient population? Dentrix only allows per-person alerts to be set, so there is no way to natively set a large number of alerts to a target set of patients. However with the instructions below, one can set a group of alerts with limited difficulty!
In our office we want to use the email information for each patient more and more. The problem is that at least half of the patients have not supplied this information. We tried to simply look for this information as each patient was in our office, but it is too difficult to remember to check. Therefore we want to set up a patient alert for each of the patients with no email. To do this I set up a Dentrix alert in each chart with a blank email field. Now whenever a staff member opens an appointment card or chart for one of these people, they will know to ask the patient for their email address.
Dentrix requires that these alerts be set on a patient-by-patient basis. So we will have to perform a query, then use AutoHotkey to open each patient’s Family File and set the alert. For our run, it took the machine about 10 seconds per patient to set the alerts, so the entire process only took a couple of hours. This isn’t the most straightforward activity, but it eventually saves the time it would take to either manually enter each patient’s alert or to hunt for this information when they are in the office (if you even remember to look for it).
Perform A Query
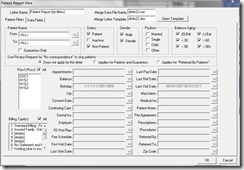
 First we need to set a query. The best way to search for any group of patients by criteria is to open the “Patient Report (by Filters")†document. Since Dentrix is not able to search for the absence of information, we’ll just perform a search for all active patients (with and without email addresses).
 Go to Office Manager | Letters | Misc… | Patient Report (by filters)" (double click on the document name)
 - Set the search criteria to match all of your active patients. I selected “Patient†“non-patientâ€, both genders, all balance aging, then cleared all field in the lower half of the screen. One could also just search for all active patients whose Last Visit Date was between, 2007 (for example) and today.
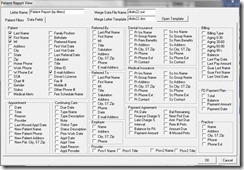
- Then go to the Data Fields tab (in the upper left), and make sure that only Last Name, First Name, MI, and Email Address are selected.
- Select OK
- Select Create/Merge
- Deselect “Add to Journal†and hit “OKâ€
Dentrix will run its search for several seconds. When the search is complete, hit View List. Select All off the text, and Copy it.
Now let’s do a few things in Excel with our data:
- Open Excel
- Select cell A1 and Paste the data into the sheet.
- Select All, then go to Data | Sort…
- Select the Header Row radio button.
- In the Sort By window, select “EmailAddressâ€, Ascending
- In the first Then By box, select “LNameâ€
- In the second Then By box, select “FNameâ€.
- All three sections should have “Ascending†selected.
- Hit OK.
This now separates our list into those with and without emails. You can now delete the lines with emails, leaving only our list of targeted patients.
Let’s do a second operation in Excel, one that formats the data as we need it.
- Now that the EmailAddress column is empty, lets change cell D1 to read “Resultâ€
- Select Edit | Replace
- In Find What, type a single quotation mark: “
- Leave Replace With empty, and hit Replace All.
- This should remove all of the quotation marks from your Excel page.
- Next, let’s combine these entries:
- In cell D2, type in this phrase: =CONCATENATE(A3,", ",B3," ",C3)
- Hit Enter
- Cell D2 should now display the patient’s name with last name first, a comma, and the first name and middle initial. This is the format Dentrix’s patient selection screen uses to display a patient.
- Copy the concatenate cell to every cell below it for as many rows as there are patient names.
- Select the D column (click on “D†at the top of the column)
- Copy the column of selected, correctly formatted patient names.
- Open Microsoft Word with a blank document active
- Select Edit | Paste Special…
- Select Unformatted Text and hit OK
- Save this document with the filename of “PatientsWithoutEmail.docâ€
Running The Script
 We will work from this list, running our script which will call up Dentrix modules, perform actions, and return to the Word document. The script’s last action is to bold the text of the current patient, so one can see which patients have had the alert.
You’ll want to run the script on only one or two patients so that you can detect any errors. Once you feel more comfortable that the script is running reliably, go ahead and do a bigger number. I got comfortable running 500 at a time before we finished.
To run the script (which follows at the end of this article), make sure that you are logged into your Dentrix user account and have opened the Dentrix Family File. Then put the cursor on the first line of the Word document, and hit Ctrl-e to run the script. The script prompts the user for how many names it should process. Once the script is completed, hit Ctrl-e again and enter a new number of processes to run.
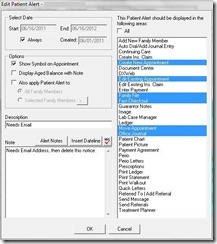
The script will put the message “Needs Email†for “Alwaysâ€, will Show Symbol on Appointment, and will be displayed in:
- Create New Appointment
- Edit Existing Appointment
- Family File
- Fast Checkout
- Move Appointment
- Office Journal
Once the patient’s blank email is addressed, the staff member can open the patient’s Family File, open the Patient Alerts module (by clicking on the yellow flag icon on the toolbar), select the Needs Email alert, and hit Delete.
Beware that this new alert may interfere with other scripts you run, such as the one previously posted here for texting patients using Google Voice. The new scripts need to look for the existence of the Patient Alert and Family Alert windows and dismiss them as needed.
The need for email addresses with our patients will continue to grow. While the task of getting these addresses can be daunting for a patient population of a couple of thousand, a good alert system can help a practice gather this information for most of the practice in just a six month period.
The Script
Following is the script needed to execute the flagging. Copy it, paste it into Notepad, and save the document with an .ahk extension (i.e. “msgemail.ahkâ€). After having installed the AutoHotkey software, simply double-click on the .ahk file and the computer is armed and ready for your Ctrl-e command!
;
; AutoHotkey Version: 1.x
; Language: English
; Platform: Win9x/NT
; Author: A.N.Other <myemail@nowhere.com>
;
; Script Function:
; Template script (you can customize this template by editing "ShellNew\Template.ahk" in your Windows folder)
;#NoEnv ; Recommended for performance and compatibility with future AutoHotkey releases.
SendMode Input ; Recommended for new scripts due to its superior speed and reliability.
SetWorkingDir %A_ScriptDir% ; Ensures a consistent starting directory.; This script requires having the resulting Word document and Family File open before launching.
; It takes about 12s per patient to run^e::
GUI, Destroy
gui, Add, text, x20 y+11, How many names should be processed?
gui, Add, Edit, x220 y+-18 w90 vmult,
GUI,Add,Button, w60 x150 y+26, OK
gui, Add, text, x10 y+11, Reminder: Have your Word document and the
gui, Add, text, x62 y+1, Family File open before hitting "OK"!
Gui, Show, w370, iPad Names Setup
returnButtonOK:
GUI,submit,Loop, %mult%
{
;CREATE PATIENT ALERT
Send +{End}
sleep 200
Send ^c
sleep 200
ClipSaved_3 = %Clipboard%
sleep 200
send ^b
sleep 200
WinActivate, Dentrix Family File
sleep 200
WinWait, Dentrix Family File
sleep 200
Send {F2}
sleep 200
Send %Clipsaved_3%
sleep 200
Send {ENTER}
sleep 2000
IfWinExist, Family Alert
{
WinActivate, Family Alert
sleep 300
Send !d
sleep 300
Send {ENTER}
}
IfWinExist, Patient Alert
{
WinActivate, Patient Alert
sleep 300
Send !d
sleep 300
Send {ENTER}
}
;Family File
send !f
sleep 300
send t
sleep 300
send !n
sleep 300
WinWait, Create Patient Alert
sleep 300
send !a
sleep 300
send {TAB}
sleep 300
send {SPACE}
sleep 300
send {TAB 3}
sleep 300
send Needs Email
sleep 300
send {TAB}
sleep 300
send Needs Email Address, then delete this notice
sleep 300
send {TAB 5}
sleep 300
send {DOWN 4}
sleep 500
send {SPACE}
sleep 300
send {DOWN 3}
sleep 300
send {SPACE}
sleep 300
send {DOWN 3}
sleep 300
send {SPACE}
sleep 300
send {DOWN}
sleep 300
send {SPACE}
sleep 300
send {DOWN 5}
sleep 300
send {SPACE}
sleep 300
send {DOWN}
sleep 300
send {SPACE}
sleep 300
send {TAB}
sleep 300
send {ENTER}
sleep 300
send !c
sleep 300
WinActivate, ahk_class OpusApp
sleep 200
send {Home}
sleep 200
send {DOWN}
}
send ^s
return


We are using Windows 7. Do I need to change the platform: Win9X/NT to Win7? When I attempt to run hotkey to flag a patient population in Dentrix; it starts with first patient listed in family file instead of first patient in word document and attaches alert to continuing care. Any suggestions?
Hmmm. I doubt that the OS version is a factor here. Are you starting with the cursor blinking in your Word document (a list of all of your target patients)?