Fix XP’s Web Folder Error with Update

errorballIf you like to use WebDAV products as a mounted network drive from your Windows XP computer, you may have gotten errors such as “Error copying file or folder.” and “The requested header was not found”. This has been a problem especially with people trying to access content in iOS apps such as PDF Expert or Air Sharing (to name just a few).

The Windows XP instructions for these apps are correct in instructing users to add the device’s IP address as a favorite network location, however even after following the instructions exactly, one may still have errors copying or reading files from the devices.

The problem is easily solved by installing Microsoft’s Software Update for Web Folders (KB907306). The update is a direct download (no need to run Windows Update), and installs very quickly. I ran this update on my three XP computers and one of them required a reboot while the others were able to correctly access these iOS-based network locations immediately without rebooting.

Track Gas Purchase with Price

gaspumpMy wife and I each have a car, and we both want to track how much we spend of gas each year, per car. We both put gas in each other’s cars, so tracking the per car expenses can be very difficult. I could make a mark on each receipt or I could put receipt in a special place for each car, or I could just track it simply at the pump; with the price.

We simply make sure that all gas purchases for my car end in a “1” (ie. $28.41) and all purchases for her car end in an “2”. Any time I buy gas for someone else or for yard equipment, I end it in a “3”. Then when we reconcile our credit card statements in Quicken, I know exactly how to categorize the purchase.

An added bonus with this system is that any gas purchase made with my credit card with a number other than 1, 2, or 3 signals a red flag and requires investigation.

Fixing “Send To…” PDF Naming Error on iPad

At some point along the way, Apple introduced “Send To..” as an option for sending media to selected apps for better handling. One place this feature is valuable is the handling of PDF (Adobe Acrobat) files on the internet. Once open in Safari, the user can select “Send To…” and pick an app such as GoodReader or PDF Expert to utilize their features and storage silos.

Unfortunately during the process iOS usually strips the PDF’s actual filename and replaces it with “QL-xxxxxxxx.pdf” (where xxxxxxxx is a seemingly random string of characters).

Authors can save their readers much consternation if they will add a “Title” entry to the metadata. From Acrobat one can edit this metadata by selecting File | Properties , entering something in the “Title” field, and saving the file. Once the file goes to the server, gets downloaded to the reader’s iPad, and pushed to a PDF using “Send To…”, the iPad will replace the PDF’s original name with the Title metadata instead of QL-greekness. For those dynamically creating PDFs on the server side, it looks like Zend can edit the metadata on the fly (though I have not tested this yet).

I don’t know whether or not this is a bug or yet another example of Apple not perfecting the polish on iOS devices. However it is extremely annoying and I wish they would just leave the filename the way the author intended!

Show Us Your Dentrix Patient Chart Layout

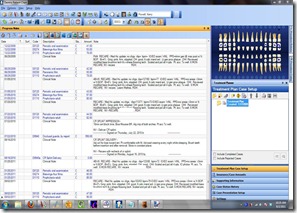
ClassicChartFans of the newer versions of Dentrix’s Patient Chart know that the ability to move modules around is a great feature. We have set up slightly different views in hygiene rooms from the views in operative and administrative, and the flexibility Dentrix offers is much appreciated.

With a patient chart view, I want to maximize the space I have. Each operatory has a 24” widescreen monitor at the 12 o’clock position, and without having to click on a tiny icon, I want to be able to quickly see the patient’s existing treatment, treatment plan, and the Clinical Note from the last visit. (I want other modules to appear, too, but that is the subject of another article.) I really want to see more history than that, though, and the default setting for the Clinical Note wastes a lot of space inserting blank lines between each Progress Note item.

I have solved this on most of my computers. I removed unwanted columns from the Progress Notes screen (right-click on any of the column heads like Date, Tooth, Code, etc and select from the menu). Notice that Dentrix puts Notes on a second line in the column headers by default. Simply drag this item up to the first line to the right of Amount, and you’ll see tons of white space disappear. The result is that I can easily Clinical Notes for the most recent 5-7 appointments.

What look have you settled on? Post a link to a screen shot so we can see! (the best way to grab a screen is to use Vista/7’s Snipping Tool. Hit the Windows key on your keyboard, and type in Snipping Tool, and select it from the start menu results. Get a Window snip, then edit it in something like paint to remove personal information. It should take about 5 minutes to complete this portion, but it will be a help for years to come for the rest of us.)

Teach Your Expensive Shades to Swim

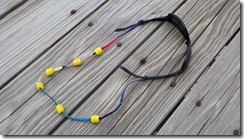
2011-07-23_18-43-51_138If you’ve ever lost a pair of $200 sunglasses in the ocean, then you know that sinking feeling I once did. Refusing to let it happen again, I looked around in the area surf shops for something that would keep my next pair of sunglasses afloat, but it appears the idea is “lost” in the beachwear world. With an hour and about $20, one can save that pair from the turbulent surf.

According to medical sources (#1, #2) sunglasses can protect the eyes from UV light and prevent cataract formations. Around water the eyes get bombarded from below as well as above, so polarized lenses can help to not only protect the eyes, but also enable one to monitor the water more closely.

This solution offers floating sunglasses, but beware; I would only wear them when dealing with light duty (playing with small children in shallow water, riding on boats, etc.). I would not rely on this setup for skiing, windsurfing, or surfing.

What you need:

  • 1 shoestring or lanyard-style sunglasses strap. (foamy ones like Croakies will not work) (#1, #2)
  • 6 yellow foam earplugs (available at Home Depot, Lowe’s, etc)
  • 1 1/8” drill bit
  • 1 1/4” drill bit
  • 1 pair of pliers
  • 1 drill

The object here is to thread the earplugs down the thin sunglasses strap. In order to create a hole, grab the earplug along it’s long, curved edges, and hold the plug on a workbench, vertically. With the smaller drill bit, create a hole through the long axis of the earplug. If that hole is not big enough to slide onto the strap, use a larger bit to open the hole a bit more. Sunglasses come in different weights, but usually 6 floats will do. Be sure to spread them evenly, and test in a sink, bathtub, or pool before hitting the surf!

Flagging A Patient Population in Dentrix

flagHave you needed to set Dentrix alerts to a specific portion of the patient population? Dentrix only allows per-person alerts to be set, so there is no way to natively set a large number of alerts to a target set of patients. However with the instructions below, one can set a group of alerts with limited difficulty!

In our office we want to use the email information for each patient more and more. The problem is that at least half of the patients have not supplied this information. We tried to simply look for this information as each patient was in our office, but it is too difficult to remember to check. Therefore we want to set up a patient alert for each of the patients with no email. To do this I set up a Dentrix alert in each chart with a blank email field. Now whenever a staff member opens an appointment card or chart for one of these people, they will know to ask the patient for their email address.

Dentrix requires that these alerts be set on a patient-by-patient basis. So we will have to perform a query, then use AutoHotkey to open each patient’s Family File and set the alert. For our run, it took the machine about 10 seconds per patient to set the alerts, so the entire process only took a couple of hours. This isn’t the most straightforward activity, but it eventually saves the time it would take to either manually enter each patient’s alert or to hunt for this information when they are in the office (if you even remember to look for it).

[Read more →]

Posting AVC-HD Files to YouTube Using VideoReDo

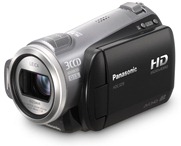
panasonic_hdc_sd9A few years ago we bought a wonderful HD camera. The Panasonic HDC-SD9 camera has been a slam dunk success in our family. By adding an 8GB SD card, the camera has ample storage to go with its excellent battery, size, and picture quality.

The big problem with this camera is handling the videos once one has completed recording. Panasonic bundles the camera with some of the worst software known to man, however the best way to handle the videos is to ignore that bundled software and use other products.

In another post I’ll discuss handling the files (I just use Windows Explorer), but the focus here is getting Panasonic and Sony’s .mts files up to YouTube. One way to prepare these files is with Windows Live Movie Maker. However Microsoft has oversimplified that product to the point that it is difficult to use. The best product, easily, is VideoReDo because of its blazing fast speed as well as versatile, easy to use settings.

VideoReDo has two modes: Cuts and Scene. Essentially the user picks whether they want to throw away the selected scenes or keep the selected scenes. To me it makes more sense to keep selected scenes, so I use Scene Mode. (This is selected thru Tools | Options… | General Parameters | Editing Mode)

Once a video is edited one has to pick a codec that is compatible with YouTube. While there is a growing list of compatible formats with YouTube, I’ve only found one that works reliably for HD video. The way to select it is to do the following once editing is complete:

  1. Select “Save As…”
  2. Type a filename and location
  3. In the “Save As Type…” box, select MPEG2 Program Stream (*.mpg)
  4. Select the “Options” button
  5. In the Video section of the dialogue box, select the “>” button to the right of the resolution numbers, and select “1280×720” in the list.
  6. In the Header Bitrate section, select 10000 from the pulldown menu
  7. In Max Bitrate, select “9500 (DVD)”
  8. To save time in the future, click the “Save as New Profile” box at the bottom, then rename this setting in the top box to something like “YouTube Upload”
  9. Select “OK”, then Save to save the file.

VideoRedo will spend a few minutes transcoding the video, but when it is complete, open your YouTube profile page and select “Upload” at the top. Navigate to your saved video, and begin the process of uploading the video. The result should be an “HD” video that is easily navigable.

There are three levels of VideoReDo

  • VideoReDo Plus ($50)
  • VideoReDo Suite Version 3 ($75)
  • VideoReDo Suite with H.264 ($100)

I believe that the $50 product will do the task at hand, but honestly, I do not know. Being an avid Windows Media Center 7, Android, and iPad user, I got the $100 version and it is some of the best $100 I’ve ever spent in the computer world. With this level I can take HD Home Video, Time Warner Recorded TV (via Windows Media Center) or captured VCR tapes and create compilation DVDs or convert them for playback on the Android phone or iPad. There are other products for doing these actions, but they are all extremely slow and are difficult to work with.

Here is one of my videos from this camera, uploaded using the method described:

Playoff Calendars Are Easy to Follow

Tired of the stress of trying to keep up with which pro playoff game is on tonight? Then your problems are over. Simply add my Playoff calendar to your Google Calendars and all of the championship events will appear in your group of Google Calendars.

2011 Playoff Calendar (Gcal)